Food Post - 6 May 2019
I tell you what, I have learned so much in this latest round of cooking. So much. (Read: several errors have been made and I am now enlightened.)
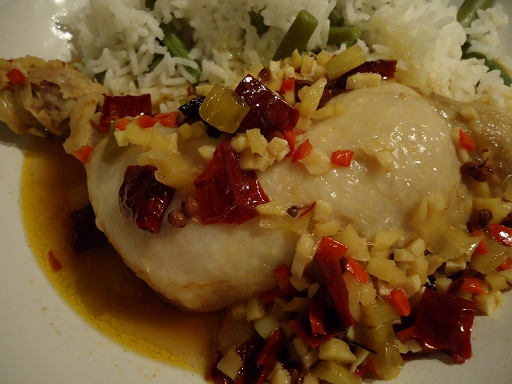
Sichuan style simmered chicken legs (recipe from "Chicken Leg" by Hoe Yee)
This recipe didn't actually tell you what to do with half the ingredients (the ginger, garlic, spring onion and chillies), so I just dumped them in the pot with the chicken and let the thing stew away. The recipe says to simmer the chicken, covered, for 30 minutes, but I left if for 50 minutes, as always. Once the time is up, the recipe said the sauce would be thick, but it has said this before on previous recipes and, honestly, no thickening happens when the lid is left on, so I wasn't disappointed when I ended up with a thin sauce. In fact, I wasn't disappointed at all. This dish is really tasty. The star anise, sugar, Sichuan pepper and soy sauce make a great taste when combined with the other ingredients. Absolutely delicious. There is a lot of chilli in the dish though; not enough to be super uncomfortable, but enough to make me choke a few times when I was trying to eat too quickly (but it was too tasty to eat slowly, so what could I do?)
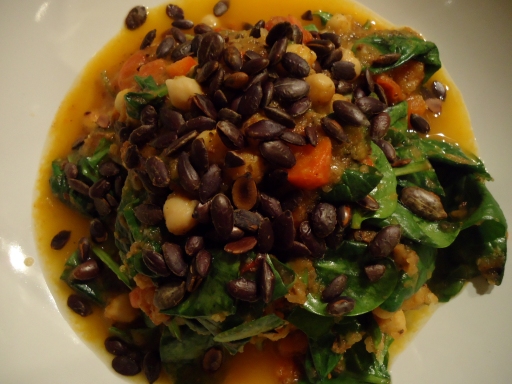
Chickpea egusi-style soup (recipe from "The Groundnut Cookbook" by Duval Timothy, Jacob Fodio Todd and Folayemi Brown)
I know what you're thinking. You're thinking, "Are those pumpkin seeds on top? They're looking pretty burnt." Well, ok there, Mrs Observant. Thanks for noticing. Let's deal with those two observations separately, shall we? Firstly, they are indeed pumpkin seeds. Egusi is a soup made with seeds of the egusi melon. I couldn't find egusi seeds, but I heard that pumpkin seeds could act as a substitute, which is why I've only called this recipe "chickpea egusi-style soup" rather than just "chickpea egusi" as it is labelled in the recipe book. The recipe also said to use scotch bonnet peppers, but the supermarket had run out, so I substituted with normal red chillies. The resulting dish was probably less hot than it should be, but with the paprika in there too, it was hot enough for me. Having made a few recipes from this book now, I am coming across a fair number of editing mistakes. This recipe calls for 3 teaspoons of salt. Halfway through the recipe it says "Add [...] the other 2 teaspoons of salt." But not anywhere does it say what to do with the first teaspoonful! However, seeing as 2 teaspoons still feels like a lot for four portions (in my opinion) I left the third teaspoon out, and that was just fine for me. As for the pumpkin seeds being burnt, you were supposed to roast them in the oven for 12 minutes; I did just that, which led to mine turning this colour. Oh dear. Half the roasted seeds are ground up and added to the soup base, while the rest are sprinkled on top. This gave my soup a bitter, burnt undertone, which actually wasn't as unpleasant as you might think. Maybe the reason it wasn't unpleasant is that, burntness aside, this dish is super delicious. Really great! It is sweet and warm, rich from the seeds, and so fresh! The sweet tomato base really helps with the fresh taste, but then adding in red pepper and spinach at the end just ramps up the freshness to another level. Really delicious, really lovely. If I hadn't burnt the main component, this would be stunning.
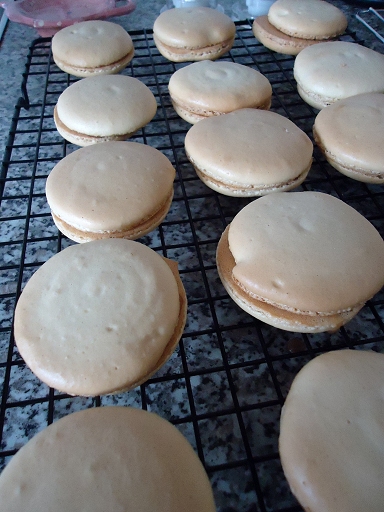
Caramel macarons with caramel cream (recipe from "I ♥ Macarons" by Hisako Ogita)
Ah yes. It's that time of year where I attempt to make macarons and then rue the decision. So stressful! Why do I do it? Why do I give myself the stress? But then everyone at work happily ignored that these weren't perfect and gave me lots of compliments so... that's why. Despite the compliments, I'm not sure I'm improving when it comes to macarons. This is the fifth(?) time I've made them, and they still don't look like the really pretty ones on all the macaron-centric food blogs. One day! One day I will get there! This time I had issues with the feet. You can't really tell from the picture (because I hid the really ugly ones) but a lot of the feet were non-existent. They pretty much all had feet in the oven, but the feet then collapsed when I took them out of the oven :( Frantic Googling tells me that this is because they came out of the oven before they were fully baked. I had issues with the bake on these, because I was worried about overbaking them (see burning the pumpkin seeds above) and subsequently underbaked them. When I first put them in the oven the feet were growing like crazy and the top was browning like crazy, so I turned down the oven and put foil on top. Alas, I don't think I increased my bake time enough to match the new low temperature. Something else was maybe at work too. The recipe book blithely says that you can make caramel macarons by adding caramel powder to the macaron batter. Sounds cool, right? Until you realise that caramel powder isn't a thing you can buy; it's a thing you have to make. Basically, you melt sugar to make a caramel and then crush it to make a powder. No big deal. It's not like making caramel is the thing that always goes wrong on every cooking contest ever or anything. Actually, my caramel powder came out fine. What didn't come out fine was my food processor. It turns out that thick, hardened caramel is so hard that it will dent your food processor's blades. Here is learning point number one in this post (ding ding!) Have some mercy on your food processor! Don't chuck hardened caramel in there! Anyway, my caramel powder was fine, but I wonder if essentially adding more sugar to the mix made the macarons more liable to getting overbaked on the top while still being liquid enough (when baked) to collapse in on themselves and ruin the feet? It's just supposition at this point, but I'm looking for a scapegoat to blame for my lack of feet. For the caramel cream used to sandwich the macarons together, you make yet another caramel and this time add cream to it (I am so tired of anxiously watching pans of sugar heat up!) My caramel cream was a bit on the runny side (maybe I didn't heat the sugar enough) so it did tend to dribble out of the sides of the macarons when left unattended. Oh well. Things have happened, lessons have been learned. Will my food processor ever deign to chop anything again? Who knows? But the taste of these macarons was good. Very very sweet (as expected from all that caramel) but decidedly good. Hence the lovely comments from the folks I fed them to.
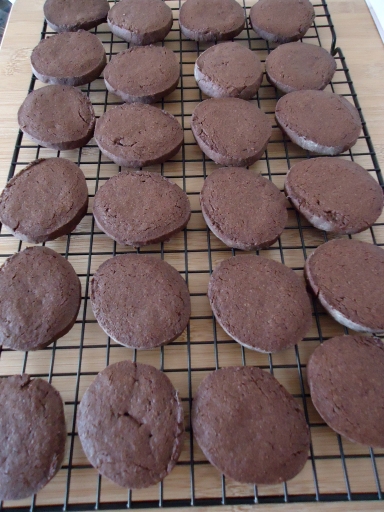
Chocolate icebox cookies (recipe from "I ♥ Macarons" by Hisako Ogita)
These cookies used up some of the egg yolks I had left over from the macarons. They look better than last year's attempt at the vanilla version of the same cookies. The dough was less crumbly than the vanilla version and easier to work with, which may just have been due to mixing it more than I did last time. Unfortunately the taste was... Look, the people at work were very kind about them, but the cookies tasted bitter to me. They're not a very sweet cookie in the first place, so there wasn't quite enough sweetness to stand up to all that bitter cocoa powder. Also, how do you know when chocolate biscuits are cooked? I have no idea, which means I think I left them in the oven too long. They don't look burnt, but the bitter taste was suspiciously similar to a burnt taste.
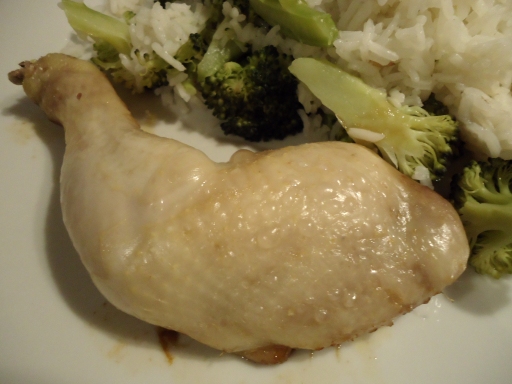
Simmer cha xiu chicken leg (recipe from "Chicken Leg" by Hoe Yee)
Believe it or not, this insipid-looking thing was meant to be a rich red colour. Red. You add red food colouring to the dish to give it that cha xiu look. I added a lot of red food colouring, and was left with only the slightest hint of it, just enough to make the chicken look worryingly pink. (The chicken was fully-cooked though. I simmered it in the sauce for 50 minutes, rather than the 20 minutes given in the recipe.) Here we have learning point number two in this post (ding ding!) If using food colouring in cooking, make sure the label says it's bake stable. I had actually used the same red food colouring for macarons a while back, and had been disappointed when they turned out to have brown, rather than red accents. At the time, I blamed it on my baking skills, but now I know better. The food colouring I had bought proudly proclaimed itself to be natural colouring (I don't care about that; I bought it because it was the supermarket own brand, so cheaper than the branded version). I have since learned that artificial colours are the more stable ones. At which point you get a rant from me, because why sell food colours that aren't stable? Why do all products sold have to be "natural"? Natural doesn't mean it's better for you, and artificial doesn't mean it's bad for you. Natural means that it has been distilled in a laboratory from some kind of plant/animal product rather than being created in a laboratory from base chemicals. That's it. Your body doesn't care if it's natural or not; your body only cares if it's safe to eat. Many natural things can be poisonous and many artificial things can be completely harmless. Anything that's sold as a food product (in the UK at least) is harmless and safe to eat. So why are we forced to use "natural" things that don't work half as well as the artificial versions? Because the western world is currently full of rampant chemophobia that is, at best, annoying, and at worst actively-harmful (see anti-vaxxers). Seriously, guys. Chemicals aren't bad. You are literally made of chemicals. All matter in the whole universe is made of chemicals. What part of chemicals don't you like? I just want to buy some food colouring that actually works godammit! Rant aside, this dish is meant to be a chicken version of cha xiu pork. It's tasty! Sweet and salty, and simmering it in the marinade leaves it really moist. Not quite as good as cha xiu pork (is anything as good as cha xiu pork?) but still nice to eat. Just ignore the goddamn colour.
And finally
There's one more learning point in this post that I haven't mentioned yet. After burning my pumpkin seeds for the egusi-style soup, and having my macarons brown too quickly, and then burning the icebox cookies, I started to put two and two together. I added another two when I remembered that I had been fiddling with the oven thermostat recently, after it came loose when I cleaned the oven a few weeks back. And so, thinking that maybe my oven was a little on the hot side, I did as all the macaron blogs recommended and bought an oven thermometer. This is learning point number three (ding ding!) Buy an oven thermometer. It's a game changer. When I tried it out I discovered that my oven is too hot by 40°C. That's over 100°F! Like I say, I had been fiddling with the thermostat, so I think my oven was out by far more than other ovens would be, but still. No wonder. No wonder my stuff in this post was burnt to a crisp! Given the odds I was fighting against, I'm seriously impressed that I was able to turn out macarons at all. I haven't really tried out my oven since this new knowledge has been imparted to me (does a frozen pizza count?) but hopefully baking is going to get a lot less stressful from here on out.
2 comments
Comment from: Emma Visitor
Comment from: Janine Member
Again! I’m so sorry about that. Thank you for persevering despite the challenges!
Well, somehow I’ve become spam again.
I’d pologize, but I don’t know what I did wrong :)